Correa plants are great little Australian natives. They are hardy, have pretty little pendulous flowers (hence the common name ‘wild fuchsia’) and can easily be propagated. We propagate correas by cuttings taken during the warmer months of the year.
Harvest the cuttings
Whenever taking cuttings select a nice healthy specimen. Cut off a few branches that are actively growing (signs of new growth ie, light green tips). We find that taking the cutting from a few inches back from the top of the stem works best for us.
You want to cut the piece just below a lead join (node) and then cut just above the next leaf join (node). Below is a photograph showing what I mean.
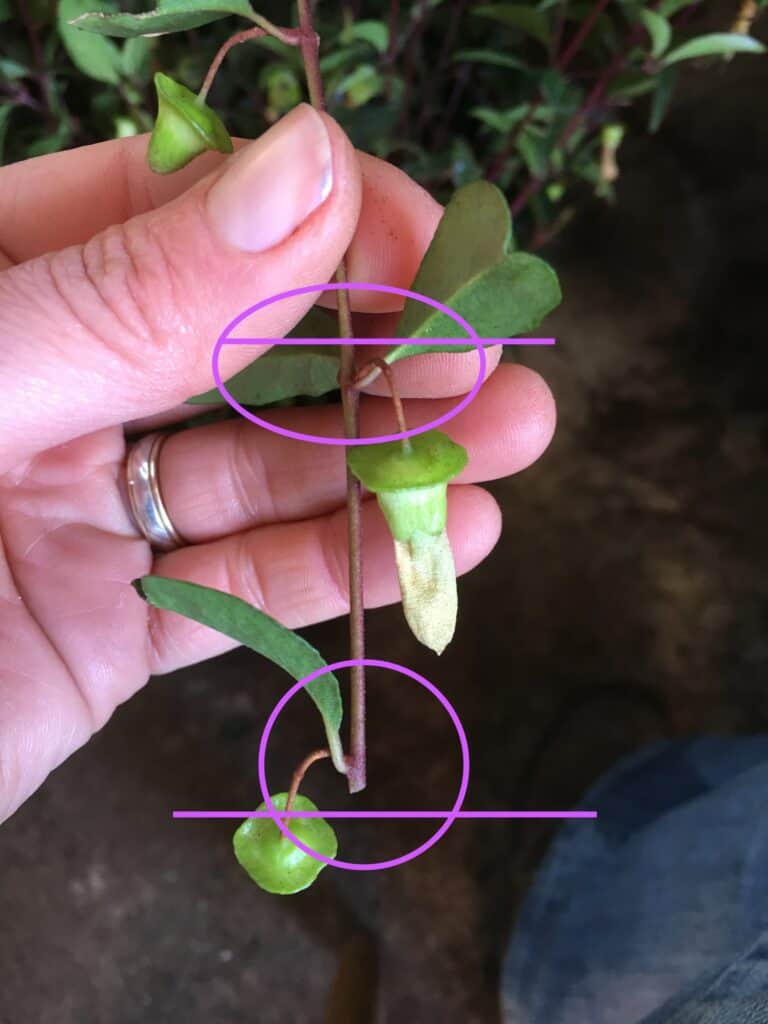
Showing the nodes and where to cut 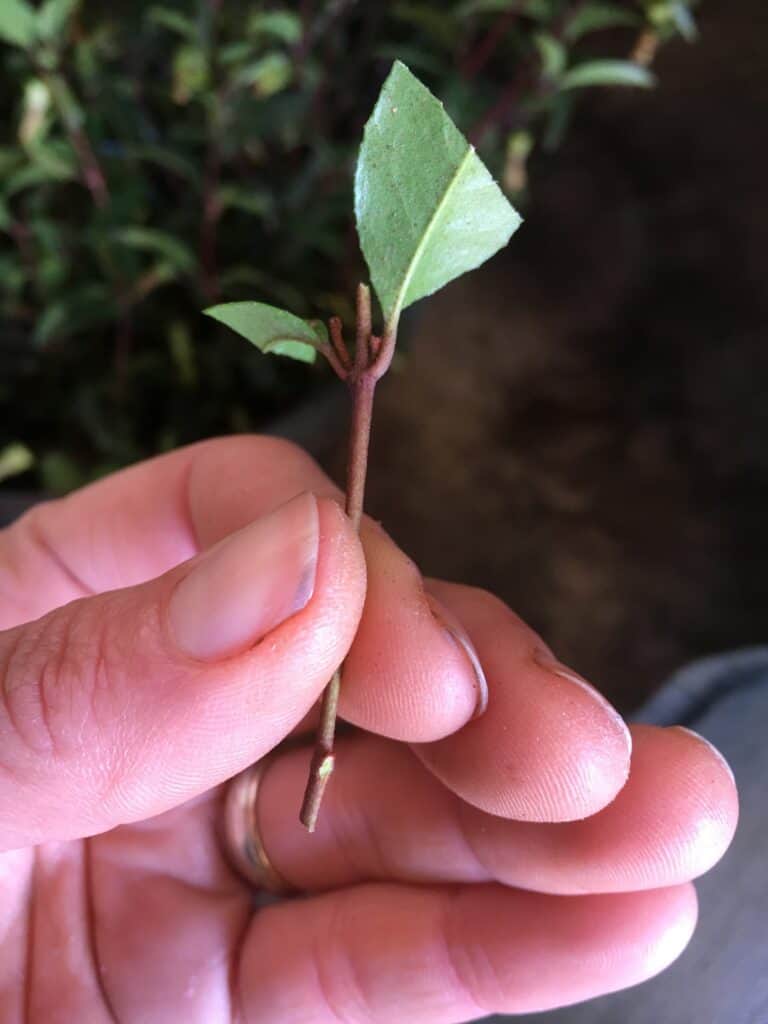
How the end cutting should look
Also trim the remaining leaves in half as shown on the second picture (above).
Remember the best time to be taking correa cuttings is from spring- early autumn. Success rates are much better than if we take correa cuttings during the winter months.
Having said that avoid taking the cuttings on incredibly hot days as it will cause stress and lower the chances of success. The correa cuttings taken for this article are Correa baeuerlenii commonly known as chefs hat correa. Success rate was over 80%.
Generating roots
To promote root growth in the cuttings we plug them into a mixture of perlite and peat moss. This mix is the same for most of the cuttings we propagate. To learn more about the benefits of this propagation medium check out our article ‘best propagation medium’.
We simply wet the mix down, then use a skewer to poke a small hole that we can insert the cutting into. In one seedling tray we fit anywhere from 200-400 cuttings. In this instance we took about 250 chefs hat correa cuttings.
You don’t need to use a seedling tray you can fill up any kind of container with the perlite, peat moss mix. Just make sure it has drainage holes so the mix doesn’t become waterlogged.
Once all the cuttings are plugged into the mix, give it a thorough watering. Then place the seedling tray (or other container) in a well lit, sheltered area. We keep the majority of our cuttings in our poly tunnel ‘igloo’.
Basically all you need to provide is somewhere that’s warm, has good light (but not direct sunlight) and protection from wind. Keep the mix of perlite and peat moss moist at all times.
Allow up to 3 months for decent root development on the cuttings. Once the roots look good you can pot the new plants into a good quality potting mix.
Potting up the Correas
Use a good quality potting mix to give your new plants the best start. We planted our New correa plants into 140mm (5.5in) pots. Don’t plant them directly into the garden just yet.
It’s best if you keep the pots in a nice sheltered position for a few weeks after potting. This is to reduce stress from the transplant and allows them to establish themselves in the soil.
After about a month move them outside into full sun, wind, basically exposure to all the elements. During this process it’s still important to make sure that the potting soul remains moist. Don’t over water just moist. Not wet!
Once the roots are filling the pot these plants can be planted into the garden, sold or given as gifts.
Hopefully you’ve found this article helpful.if so you may be interested in taking a look at our other propagation tutorials which can be found on our propagation page. Below is a quick slide show showing the above steps. This is taken from our YouTube channel.
Thanks for reading. Feel free to subscribe to our mailing list. Best of luck with your plant propagation endeavours. Happy planting 🙂